Building a snowman with Racket
This tutorial introduces some basics of programming in Racket and then guides the user through making a snowman. It assumes no previous computer science background or knowledge of math beyond basic awareness of addition, subtraction and division (which aren’t used very much in this tutorial anyway!)
Racket is a fun programming environment and is suitable for programmers of all experience levels (though this tutorial is aimed at beginners). Let’s dive in!
1 Welcome to Racket!
First you’ll need to install Racket. Then open the DrRacket program.
You’ll see two main areas: one that starts out with #lang racket (Racket includes many languages, but the default is called... "racket"). This is the "definitions" section, but we can think of it as the "stuff to keep" section. There’s also the "interactions" section, which has a ">" prompt, but we can think of it as the "playground" section.
Before we continue, make the "definitions" ("stuff to keep") section look like this:
#lang racket (require pict)
Now click "run", switch to the "interactions" section (the "playground") and try running the following:
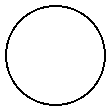
> (circle 10)
Do you see a circle ten pixels high? Cool, right? Now let’s try turning our circle red:
> (colorize (circle 10) "red")
We’ll worry more about what this means later. For now, feel excited that you’ve written your first Racket code!
2 Racket basics
Comments start with ";" and aren’t evaluated:
;; I won't run, but hopefully I tell you something useful!
Text is called a "string", because it’s a "string of characters":
"I feel very stringy!"
Racket has all sorts of numbers, like integers and floating point:
42 ; integers 98.6 ; floating point 3/5 ; rational numbers
We can add and multiply them and divide them:
> (+ 1 2) 3
> (* 3 6) 18
> (/ 10 2) 5
This is interesting... this is called a "function call". The first item in the parentheses is the function, so +, *, and / are functions to add, multiply and divide numbers respectively. The numbers we supply the functions are called "arguments".
We’ve seen this before:
> (circle 10)
circle is also a function. In this case we called circle with the argument 10 because we wanted our circle to be ten pixels high.
Functions are like legos. We can combine them together:
> (+ 1 (* 2 3)) 7
Whoa... what’s going on! Well, if we think about "substituting" each step, this makes a lot of sense:
;; Hm... we need to simplify this! (+ 1 (* 2 3)) ;; Substitute (* 2 3) => 6 (+ 1 6) ;; Substitute (+ 1 6) => 7 7
With that in mind, we can understand our colorized circle from earlier:
> (circle 10)
> (colorize (circle 10) "red")
So colorize is "transforming" the 10 pixel high circle and turning it red... cool!
Functions are like that... they take an input, and return an output. Here’s another function:
> (string-append "book" "shelf") "bookshelf"
This function takes multiple strings as arguments as inputs and squashes them down into one string as an output.
Functions are a lot like toasters: you put something in (bread), and you get something out (toasted bread). In fact, why don’t we write our own toaster function?By now you may be finding it annoying to have to type and re-type things in the interations area over and over again. Consider using the keybindings "Alt + p" and "Alt + n"... they’ll allow you to go to "previous" and "next" definitions you’ve typed before, and will save you a lot of typing.
> (define (toaster str) (string-append "toasted " str)) > (toaster "bread") "toasted bread"
> (toaster "bagel") "toasted bagel"
> (toaster (toaster "bread")) "toasted toasted bread"
We can figure out how this works via substitution also. When we pass in "bread", toaster binds that to str, so:
(toaster "bread") ;; becomes (string-append "toasted " "bread") ;; becomes "toasted bread"
What happens if we try to toast something that isn’t a string?
> (toaster 123) string-append: contract violation
expected: string?
given: 123
argument position: 2nd
other arguments...:
"toasted "
That’s an error! string-append can only append strings!
We can raise our own errors:
> (error "Yuck!") Yuck!
Maybe it would be useful if we gave a more descriptive error when we tried to feed our toaster something that isn’t a string. But first, we need to know... when is something a string? Racket has functions that answer questions like this. They usually end in a "?" character, and we call them "predicates". Here’s one called string?:
> (string? "bread") #t
> (string? 42) #f
Oh that’s interesting... we haven’t seen #t or #f before. Can guess what they mean? If you guessed "true" and "false", you’re right! These are called "booleans".In Racket, everything that isn’t #f is technically true!
Now that we have a way to check whether something is a string, we need a way to conditionally do one thing if something is true and another if something is false. As it turns out, this kind of expression is called a "conditional", and one such conditional is called if!Two other useful conditionals are when and cond, but we won’t cover them in this tutorial.
(if (string? "bread") ; this is the "test" "That looks like a string" ; run if true "That's not a string!") ; run if false
Now that we have if and string? we can make a better toaster:
> (define (toaster str) (if (string? str) (string-append "toasted " str) (error "Toasters can only toast strings!"))) > (toaster "submarine sandwich") "toasted submarine sandwich"
> (toaster 42) Toasters can only toast strings!
This is a good toaster! It would be a shame if we lost it, so we should hold on to it. To do so, copy the toaster function definition from the interactive area and paste it into the definitions area.It’s possible that the indentation won’t look right when copying and pasting. No problem... just highlight the code and press the "tab" key. (You may also want to save this to a file.) Now your definitions area should look like:
#lang racket (define (toaster str) (if (string? str) (string-append "toasted " str) (error "Toasters can only toast strings!")))
Now press "run". The interactive area will reset, but since we’ve defined toaster in the definition area we can still run it:Another name for the interactions section / playground is "REPL", which stands for "Read Eval Print Loop". Racket users tend to find that it’s convenient to experiment with things at the REPL and then move them to the definitions area once they mature.
> (toaster "bread") "toasted bread"
We’ve learned a lot about how Racket basics, and we’ve promised you that we’ll make a snowman. We’re almost there! But first we should cover one more datastructure in Racket... lists!
> (list "bread" "bagel" "sub") '("bread" "bagel" "sub")
We can slice and dice lists with first, which pulls the first item off a list, and rest, which returns the rest of the list:
> (first (list "bread" "bagel" "sub")) "bread"
> (rest (list "bread" "bagel" "sub")) '("bagel" "sub")
> (first (rest (list "bread" "bagel" "sub"))) "bagel"
There is a function map, which can apply a function to each item in a list. Why not use map on our friend toaster?
> (map toaster (list "bread" "bagel" "sub")) '("toasted bread" "toasted bagel" "toasted sub")
3 Building a snowman
Now we know enough things to build a snowman. Open a new file in DrRacket and Save Definitions As... "snowman.rkt". Make sure your definition includes the following, By the way, we haven’t described what require means. require is a way to import other interesting "modules" or "libraries" of code into our programs. pict is what lets us draw pictures in code, and there are many other libraries that ship with Racket, as well as many more third party libraries that can be installed. and then click run:
#lang racket (require pict)
The most important ingredient for a snowman is, of course, a snowball. Previously we used a circle and that seems close, but circles are transparent in the middle, so we should use a disk instead. Let’s make a disk 50 pixels high:
> (disk 50)

Oops... we probably want to specify a color for our snowman. Snow is usually white,Of course, you can make your snowman a different color if you prefer! so we can try that by specifying the color as a keyword argument:
> (disk 50 #:color "white")
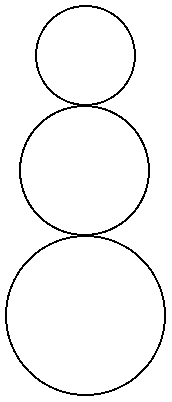
Now we need to stack them. Luckily the pict module comes with vc-append, which stands for "vertical center append". Well, we do want to stack things vertically, so let’s try it!
> (vc-append (disk 50 #:color "white") (disk 65 #:color "white") (disk 80 #:color "white"))
That’s a good start! Except maybe we could make it a bit cleaner if we had a snowball function. Let’s write one and give it one argument, size:
> (define (snowball size) (disk size #:color "white"))
> (vc-append (snowball 50) (snowball 65) (snowball 80))
That snowball function seems useful. Copy and paste it to your definitions area so you can keep it around.
In fact, it would be even cleaner if we gave each of our snowballs names. The top snowball seems to be the head, the middle snowball seems to be the body, and the bottom snow ball seems to be the... butt?
Update your definitions area so that it looks like this:
#lang racket (require pict) ;; Makes a snowball (define (snowball size) (disk size #:color "white")) ;; Snowman components (define head (snowball 50)) (define body (snowball 65)) (define butt (snowball 80)) ;; Putting it all together (define snowman (vc-append head body butt))
This is interesting... we’ve seen define used before to define the functions toaster and snowball. But now we are defining variables (names that map to values) that aren’t functions. If you look carefully you’ll notice that the function uses of define put parentheses around the first argument to define, whereas the simple variable uses of define do not.
We can now refer to these variables individually at the interaction area:
> head
> snowman
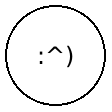
Unfortunately a snowman isn’t a snowman without a face. How do we make a face? Well one oldschool way would be to make a text-based emoticon, like so:
> (text ":^)")

Plus, now it has a caret for a carrot nose!
We can use cc-superimpose (for "center center superimpose") to see what it would look like on our head:
> (cc-superimpose (snowball 50) (text ":^)"))
Oops, that doesn’t look right. It’s too small, and it’s turned the wrong way! The first argument to text is content, but text can take up to three optional arguments: style, size, and angle.
Borrowing ideas from text’s documentation, let’s make it bold and change the size:
> (text ":^)" '(bold) 20)

Better. But we still need to turn it. The text documentation says that we need to specify angle in radians. I hear pi has something to do with circles and radians. I wonder what happens if we use pi?
> (text ":^)" '(bold) 20 pi)

Oops, that turned fit all the way around. What if we just wanted to turn it halfway around? I guess that would be half of pi?
> (text ":^)" '(bold) 20 (* pi 1/2))

Gah! That’s halfway, but in the opposite direction, so let’s try turning it... negative halfway?
> (text ":^)" '(bold) 20 (* pi -1/2))

Whew! That looks good. Let’s try putting it on the head:
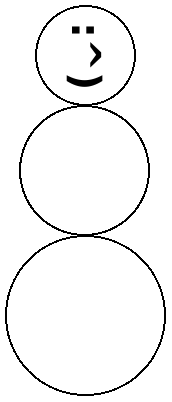
> (cc-superimpose (snowball 50) (text ":^)" '(bold) 20 (* pi -0.5)))

Well this is a much better head than we had before. Let’s switch back to the definitions window and replace our definition for head to use it:
(define head (cc-superimpose (snowball 50) (text ":^)" '(bold) 20 (* pi -0.5))))
Now hit "run". Check in the interaction area.. did our head and our snowman update?
> head
> snowman
Now that we’ve figured out how to put rotated text on the head, we can apply that same idea to add some "buttons" on the snowman’s body:
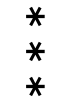
> (text "* * *" '(bold) 20 (* pi -0.5))
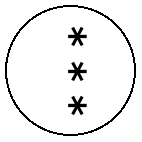
> (cc-superimpose (snowball 65) (text "* * *" '(bold) 20 (* pi -0.5)))
That looks pretty good. Let’s update the definitions area to use this new body:
(define body (cc-superimpose (snowball 65) (text "* * *" '(bold) 20 (* pi -0.5))))
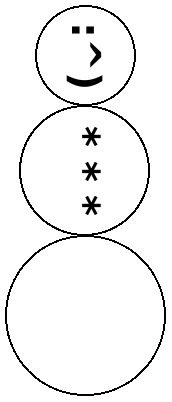
> snowman
Exercise for the reader: Can you figure out how to make the buttons out of disks instead? Hint: spacing them apart is the tricky part, but read the documentation for vc-append which can take an extra argument that can space them apart for you.
Our snowman is starting to look pretty good, but a snowman isn’t a snowman without twig arms. The "Y" character looks kind of like a twig:
> (text "Y")

But that’s way too small. Let’s make it bigger and bold:
> (text "Y" '(bold) 30)

We also need to turn it to the left:
> (text "Y" '(bold) 30 (* pi 0.5))

We’re so close, but this isn’t the right color! Brown would be better:
> (colorize (text "Y" '(bold) 30 (* pi 0.5)) "brown")

But we also need a right arm. When we rotated the face we learned that if we wanted to turn the face to the right instead of the left, we needed to multiply pi by a negative number instead. So let’s try that:
> (colorize (text "Y" '(bold) 30 (* pi -0.5)) "brown")

The code for making the left arm versus the right arm are exactly the same except for the amount we’re multiplying by pi. Maybe we should try making a function that can make an arm for us, the same way we did for "snowball". Let’s call it "make-arm", and it’ll take one argument, the amount to rotate:
> (define (make-arm rotate-amount) (colorize (text "Y" '(bold) 30 (* pi rotate-amount)) "brown")) > (make-arm 0)
> (make-arm 1)
> (make-arm 0.5)
> (make-arm -0.5)


Great... so this function is useful and those last two look like our left and right arms. Let’s move "make-arm" to the definitions area and define our "left-arm" and "right-arm", right above where we defined the body:
(define (make-arm rotate-amount) (colorize (text "Y" '(bold) 30 (* pi rotate-amount)) "brown")) (define left-arm (make-arm .5)) (define right-arm (make-arm -.5))
Now we need to stick these stick-arms into the sides of our snowman. If vc-append means "vertical center append", then it makes sense that hc-append would mean "horizontal center append". That sounds like what we want, so let’s test if we can modify our body definition to use it:
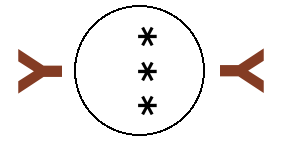
> (hc-append left-arm (cc-superimpose (snowball 65) (text "* * *" '(bold) 20 (* pi -0.5))) right-arm)
That looks right, though it’s getting a bit hard to read. Let’s copy this to the definitions area but add some comments so we remember what each part means.
(define body ;; append the left arm, torso, and right arm horizontally (hc-append left-arm ;; make a snowball for the torso and put buttons on it (cc-superimpose (snowball 65) ;; asterisks are acceptable buttons, right? (text "* * *" '(bold) 20 (* pi -.5))) right-arm))
Hit "run". Now let’s see what our snowman looks like in the interaction area:
> snowman
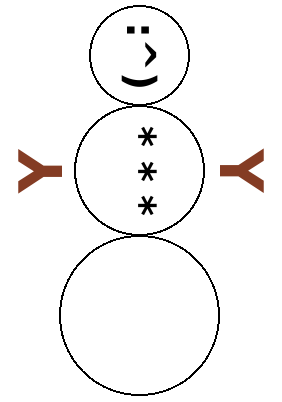
Horray! It works!
Exercise for the reader: You can keep improving your snowman! For example, you could supply your snowman with a top hat made out of filled-rectangles. Or you could make a postcard by putting your snowman on a snowy field with a sky and some "Happy Holidays" text. You could even build a function that lets you customize the postcard’s message!
At this point your code should look something like this:
#lang racket (require pict) ;; Makes a snowball (define (snowball size) (disk size #:color "white")) ;; Snowman components (define head (cc-superimpose (snowball 50) (text ":^)" '(bold) 20 (* pi -.5)))) (define (make-arm rotate-amount) (colorize (text "Y" '(bold) 30 (* pi rotate-amount)) "brown")) (define left-arm (make-arm .5)) (define right-arm (make-arm -.5)) (define body ;; append the left arm, torso, and right arm horizontally (hc-append left-arm ;; make a snowball for the torso and put buttons on it (cc-superimpose (snowball 65) ;; asterisks are acceptable buttons, right? (text "* * *" '(bold) 20 (* pi -.5))) right-arm)) (define butt (snowball 80)) ;; Putting it all together (define snowman (vc-append head body butt))
4 Where to go from here
You’ve learned a lot about Racket! But there is much more you can learn, and one of the most important things you can do as a programmer is to learn to read documentation. One important thing to know is you can right-click on many definitions in the definition area in DrRacket and select "View documentation for..."
There are many resources, but here are some good starting points:
Quick: An Introduction to Racket with Pictures – This is a complimentary tutorial to this one in many ways. It covers a few more advanced topics while remaining fairly introductory to Racket. It uses the same picture language we used here.
The Racket Guide – A handy guide to all of Racket’s core ideas!
The Racket Reference – When you really want the details on how core tools in Racket work, look here.
Continue: Web Applications in Racket – Intermediate level tutorial where you learn to write web applications.
Realm of Racket – Learn to program Racket by making video games! No prior programming experience required; has the motto "For freshmen, by freshmen".
How to Design Programs, Second Edition – A complete textbook for learning to program using Racket, made for the classroom. Teaches advanced topics without assuming prior programming knowledge.
That isn’t enough? Can’t stop learning? Here are some more advanced resources:
More: Systems Programming with Racket – Writing a web application wasn’t enough for you? Why not write a web server in Racket?
The Little Schemer – A good book for getting comfortable with recursion and understanding how programming languages work (but not for learning how to write a "practical" everyday style of Scheme (Racket’s main language is a kind of Scheme, which is a kind of Lisp, which is a kind of programming language with parentheses)). Written in a question and answer form, funny, and builds up deep topics fast. By the end of it, you’ll write a version of Scheme in Scheme!
Structure and Interpretation of Computer Programs – What used to be MIT’s "introductory" computer science book, but don’t let that fool you... it’s one of the most advanced (and fun) programming books around. Learn what the "soul" of the computer is... you’ll learn core ideas, and eventually will even write your own compiler! Some nice resources online for it, including this very pretty HTML version and original lectures from the 1980s can be found online.
See https://racket-lang.org/ for more information, including how to talk to Racket’s community. Don’t be afraid to reach out if you get stuck!
Racket is a good programming language environment for everyone from beginners to experts. Don’t get intimidated by how much there is to know or give up if you get stuck! Racket is for everyone, including you... yes you!